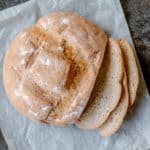
Thermomix Cheat's Sourdough
Fake it til you make it with this Thermomix Cheat's Sourdough! This version requires less time and effort and tastes pretty much the same as the real deal.
Servings: 20
Calories: 109kcal
Ingredients
For the Starter
- 100 g rye flour
- 125 g white bread flour
- 7 g sachet of fast action dried yeast
- 225 g cold water
For the Main Dough
- 375 g white bread flour
- 175 g cold water
- 2 teaspoons salt
Instructions
For the Starter
- Add the 100g of rye flour and 125g of white bread flour to the Thermomix bowl, then add the yeast. Add 225g cold water and knead for 30 sec/dough setting until combined.
- Transfer the mixture to a large bowl and cover with cling film. Leave for 24 hours in a warm place. It will be sticky and will bubble up and expand.
For the Main Dough
- After 24 hours, uncover the bowl with the 'starter' and transfer it to the Thermomix bowl.
- Add 175g of cold water, 375g of white bread flour, and 2 teaspoons of salt. Knead for 2 mins/dough setting. The dough will be soft and slightly sticky.
- Tip the dough onto a lightly floured surface and knead into a ball. Then transfer it to a large bowl, cover with cling film, and leave to rise for 2-3 hours until doubled in size. Timing will vary depending on humidity, etc., and watching the dough and not the clock is always best.
- When doubled in size, knock back the dough once to deflate it. Then, turn it onto a lightly floured work surface and gently form a ball. You don't want to knock too much air out of it. Fold the bottom edges of the dough together to create a smooth surface on top (see images 5 and 6 in the recipe post).
- Place the dough on greaseproof paper sprinkled with flour and cover with a tea towel for 1 hour. Twenty minutes before the dough is proofed, preheat the oven to 220°C/425°F (200°C fan). Place a large tray in the oven and a smaller one underneath to heat up. Ensure the small tray underneath has tall sides, as it will be filled with water.
- Score the top of the dough with a sharp knife (see photo 8 in the recipe post), then transfer it with the greaseproof paper underneath into the hot oven. Carefully pour some water into the bottom hot tin so that the steam will give the bread a lovely crisp crust.
- Bake in the oven for 30-35 minutes until the loaf is golden and sounds hollow when tapped underneath.
- Leave to cool on a wire rack before slicing.
Notes
See the recipe post for step-by-step photos and storage instructions.
Nutrition
Calories: 109kcal | Carbohydrates: 22g | Protein: 4g | Fat: 1g | Sodium: 213mg | Fiber: 1g
